1981 Mercedes Benz 500SLC
In early febuary 2009, I worked out a deal on the sale of my 1972 Blue Mercedes Benz 280CE. The deal came by surprise as I was in communication with a gentleman called Rusty who sold me his 1972 350SL because it required floor pans. I was showing him the progress that we made thus far on the 350SL and he mentioned that he was now on the look out for a 70's 280C.
At that point, I had to tell him about mine. Rusty is quite handy, he got the 350SL running like a champ when I saw it so I was confident that he would not be intimidated by a non running car.
He took a look at the 280CE while it was on the rack and could see that the floors were mostly solid with the exception of the front foot well on the drivers side and a little on the front of each rockers.
I told him that once he got it running, he was welcome to come bring it to my shop and we would work on the floor together. I think that this sealed the deal and he agreed to take the car from me.
Around the same time, Sharon, the lady who is handling the estate of a gentleman who was a huge enthusiast of the 107026 models had one more 500SLC that she needed rid off. The black 81 500SLC.
The car has some rust issues but was very presentable. It had been sitting for some time (tags expired in 2003), and it appears that rats had made a nest under the hood. I tried to help Sharon sell this car and showed it to a couple of people who were a little concerned about the rust issues and passed. It also did not run.
When Sharon sold the house where the car was being stored, a friend agreed to keep the it but that has been some time and he was ready to see it go after it sat on his drive for months on end.
I agreed to buy it and do whatever needed to get running and then maybe sell it. This is where the fun began.
At first, I was going to get a trailer to go and get the car but then I thought about that really did not want to load a car with seized brakes on a trailer. I thought a better idea was to disconnect the drive shaft and pull the car on a dolly.
A friend and I turned up at Rob's house while he was at work and got cracking on pulling the drive shaft apart armed with a trolley jack and some hand tools. Four hours later, we were both still under the car and the drive shaft was going nowhere. With the bolts removed, we could see however that the diff would spin but the prop shaft will not move and hoped that this work. We still had to get the car back to the shop and the 280CE to rusty in order make space. Luckily, the 280CE is a manual transmission car and does not need this kind of effort.
The following day, we went about trying to get this car running. The first course of action was to test the fuel pump. It was getting power but there was no movement from the pump so we replaced the fuel pump, filter and some of the dry rotted hoses. The gas smelled old and nasty.
We then cranked the engine…. Nothing; so the next step was to pull the plugs. Some were dry and crusty, the others were soaking wet and crusty, the car did not want to fire. The plug wires were blue and looked like they were the wrong wires for the car. But clearly if some plugs are dry, while others are wet, there was a way to go before we got there.
We needed to pull the injectors, as they are basically nozzles on this car, they can get caked up with dirt and stop squirting fuel into the system. Normally a clean is all that is required. As I have been through this process already with a couple of SLC's. I pre ordered the injectors seals and the white sleeves and O rings from my good friend and excellent Mechanic, David Poole at European Performance.
As I suspected, the injectors were nasty and caked with dirt. I stripped them off the hard and brittle seals and used brake clean to clean the outside of the injectors and then a straw nozzle to clean the inside of the injectors until a good spray pattern can be had. The same method was used to clean the injectors on 1143 and is described here: http://alabbasi.com/injectors.html
With the new sleeves in place (which was a PITA job), we put everything back but before we cranked the car. I saw a jerry rigged set up where banjo fittings which tee'd a second connection was installed at one of the big hoses on the fuel distributor and went the warm up regulator. There an electronic fuel injector was installed. I have no idea what this set up was for. But it was non standard so I removed it and replaced the injector with a hose (not a good idea as I come to find out later).
I also took all of the plugs out and gave them a good scrub and hose down with brake clean as they were very, very dirty. When working with these old CIS cars that have been sitting for a while. Varnish and crud builds up everywhere and brake clean becomes your best friend.
I tried to crank the car up and nothing happened. I checked fuel pressure by cracking a couple of injector lines and I was getting plenty of fuel. I checked to see that if there was spark by pulling the plug wires and while there was, It was quite week, but should have been enough to get the car to fire.
In the cases where I have had to replace the fuel pump on CIS cars, I have found that these cars would run super rich so I went to back off the fuel mixture using a 3mm hex key and found that the flap would go all the way down when I pressed down and the hex key would turn freely as if there was no resistance.
It appears the piston was jammed in the piston inside the fuel distributor was stuck in the up position and hence the system was probably dumping way too much fuel.
At this point, we called it a day.
The following week, I went back to the 500SLC. I bought plug wires for it as the old ones looked quite nasty, so we quickly replaced them.
The next step was to pull the fuel distributor off and try to figure out what is going on with the piston. This was done by undoing all of the hoses and gently moving them to one side, then using an impact screw driver to undo the three screws on the top.
The piston was firmly seized inside the fuel distributor. Even after soaking it in parts cleaner and using a rubber tipped blow gun to blow compressed air into the system. I was not able to make this piston move. In the end, I broke up my trusty can of brake clean and undid the nut that holds the safety clip on the piston.
The slowly spraying brake clean into each hole, shaking the fuel distributor, I could see nasty brown fuel / varnish come out as I poured the liquid out and used compressed air. Eventually the piston started to move out to a point where I was able to gently pry it loose. It was caked in varnish so I gave it a good clean with brake clean and also did the same for the hole it came out of. Once everything was put back, the piston was able to move freely and smoothly.
I put everything back together again and tried to crank the car and it cranked and ran first time. But was bellowing white smoke like nothing I had seen. The tail pipes had two thick clouds of white smoke coming out of them to the ground and very quickly, you could not see anything.
My first fear was that there was a head gasket problem. The car ran rough and very quickly died. I then realized the oil is probably contaminated and upon checking it, it was very, very thin.
Draining it the oil was like pouring water out of the drain hole. There was no oil consistency at all. It also smelled of nasty varnish as if the fuel was in the oil for so long that it broke down.
I put some fresh oil in and then cranked the car again. It cranked, ran horribly and then died. No amount of adjustment could get the system to lean out and the adjustment screw was moving freely. As I was out of ideas, I called David and asked him for his opinion. He very quickly told me (which proved to be right) that the hex bit inside the tower has rounded which means it's no longer adjusting and that I will need to get a new tower kit (the tower is the part where you put the hex key inside in order to adjust the richness). The only was to remove the old tower is to grind it off and then unscrew the headless bolts with a pair of pliers.
Once the tower was off, I was able to adjust the richness to full lean and then crank the car, while turning the richness by ¼ turn until it fired.
Eventually the engine fired into life and I was able to run the car. There were still remains of white smoke that quickly cleared off and the car began to run like a train with only a slight miss at idle. I suspect that this could be vacuum leaks or something else but it gets better as the car warms up.
The engine is now smooth and responsive and I was able to take the car for a quick drive around the block to see if changed gear well and it shifted smoothly in all gears.
It still has a couple of hiccup areas that need ironing out. The engine later cut out which I found out was as a result of the system getting too much fuel from the jerry rigged hose set up. I need to find some fittings that go on the FD and WUR in order to just fit the hard lines onto them and will do try to do a junk yard run on Sunday. For the short term, I put the injector set up back but kept the injector disconnected so that it blocks any fuel mixture.
The next day was spent trying to get the car running. The old black plugs were pulled and replaced with new ones and the broken washer bottle was also replaced.
We then changed the oil and replaced the oil filter. While the oil was only in there for one day, it was black and very runny, possibly because of all of the gas that was still in the system. The car now starts and runs but a little rough when cold and at idle.
The brakes are very soft which I initially suspected to be air in the system. After pulling the rear wheels off, I saw that the brake pads were down to the metal. Fortunately, I had a spare set of rear pads at the shop and installed them. I also bled the system and put ATE blue racing fluid. The fluid in the system was clean but I did not know how old it was so it made sense to bleed the system.
The blue brake fluid is useful because you can quickly tell when all of the old fluid was out.
Lastly I replaced the old US style lights with the Euro lights and gave the car and the engine bay a good wash to clean off the grime and the rat dropping under the hood.
The car is now starting to look like a real car.
Next week, I plan on replacing the starter motor as it's bad and also the front brake pads as they are quite worn. I also need to put a new O ring on the fuel distributor and install a new tower on the throttle body.
I also plan to replace the fan clutch, thermostat and flush the cooling system.
I have a couple of questions. The car is black, but shows on the Russian website as anthrsite. While this car clearly looks like it has been repainted in the past. If it was ever another color then black, then I will be surprised because there is black everywhere on this car.
I even removed one of the seals under the sunroof and could see the old glue under it, and sure enough, black paint.
Secondly, the low beam does not work. The high beam is fine, and the small light for the day time running lights but not the low beam. There is now power going it to.
The fuses look good, could there be a relay?
Here are some pictures:
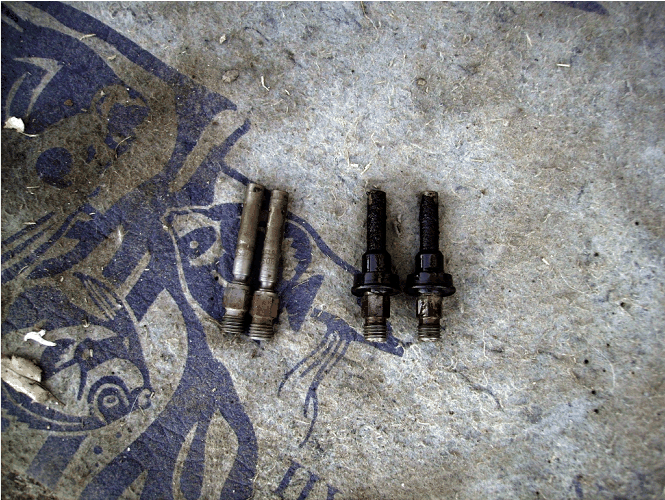
Before and after pictures of the injectors after they have been cleaned with brake clean
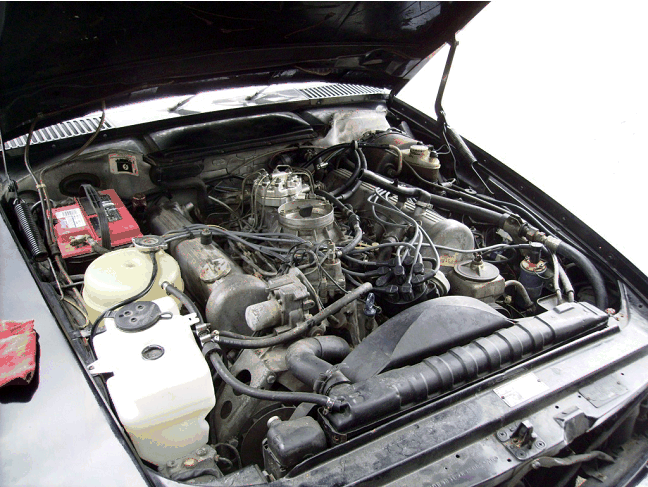
Under hood picture with the new washer bottle installed. Also notice the dodgy injector set up between the WUR and the FD
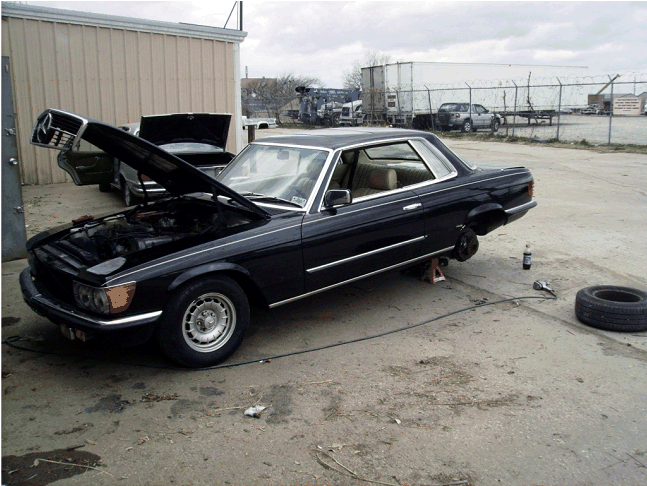
Rear end up in the air while the brake bads are being replaced and brake fluid is being flushed.
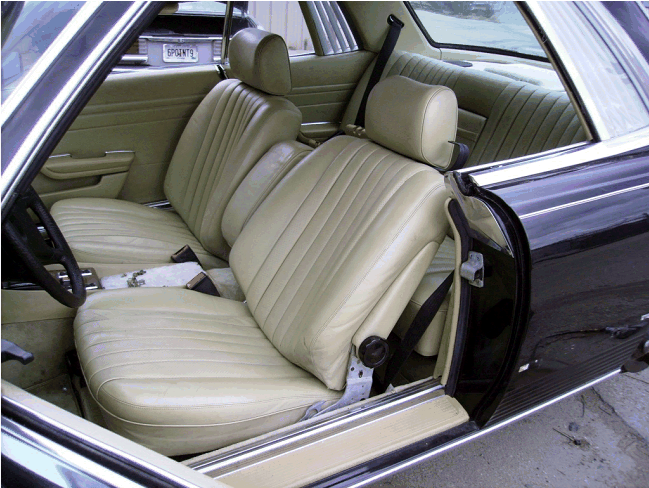
Interior is not in bad shape, but the seat bolsters feel very plasticy, I think that they may have the leatherique treatment, although I am not sure what the leatherique treatment feels like. They do not feel like leather though.
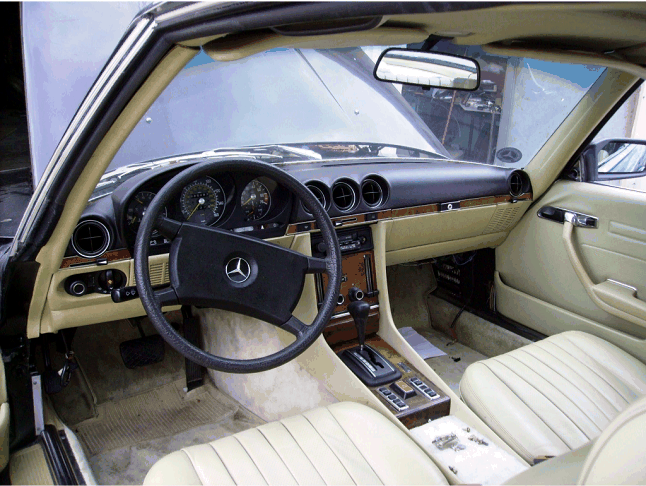
Dash with Becker grand prix radio installed. Anyone know where I can get a new knob?
Installed the original style Euro headlights with the vacuum adjust. The low beams were not working which required some additional investigation which will be discussed below.
After doing a lot of cleaning of the injectors and the fuel system; I finally got the 500SLC running. It started running reasonably well (but with a small miss) but it then deteriorated. I suspected that we had a bad fuel problem so last week we drained the tank and replaced it. But this did not seem to solve the issue. A friend of mine was concerned because he heard some popping that he suspected was a stuck valve so yesterday we pulled the plugs on the car and identified that the plug on cylinder number 4 was soaking wet.
So we ran a compression test on that cylinder and the result was 0 compression!
Cylinder number three had compression at right around 125 which also did not seem right. I did not have my book so I could not be sure of the exact values. Before I started to panic, my buddy suggested that I pull the valve cover and look at what's going on. To my surprise, two of the rockers had popped right off. Both appeared to be inlet valves on cylinder 3 and 4.
I made a quick call to David Pool at European performance to seek advice and he told me that he had a tool to put those back on without having to remove anything. He was happy to let me borrow it.
Once we got back from David's place, we put the rockers back on and buttoned up the car and restarted the engine. The engine started and felt much better but there was still a lump in the idle that I have not been able to get past. As my initial thoughts were fuel injection, I picked up an alloy fuel distributor on Ebay for $50 last week. I decided that for the heck of it, I would replace the one in the car with the one from Ebay. What a difference that made! After a few minor adjustments, I was able to get the car running quite well and it would start up on the button. This car is seriously powerful, planting the accelerator would make the car snake side to side.
Next thing that needed taking care off was the starter. I have had issues trying to find the correct one for my car because the starter that the parts places show (86x) is slightly different to the one on the car where the bolts are a little offset. On my car, the starter bolts line up exactly in front and below the starter solenoid. With the 86x model, the housing is almost the same but a little off set. The rest of the starter was the same so instead of messing with trying to find the right one. We pulled off the top of the old starter where the mounts are and bolted it to the rebuilt unit which solved the problem.
I finally figured out why the low beam was working. After talking my friend David Pool who had the electrical manual, he informed me that the issue would be either in the headlight switch or combo switch. After some further investigation, we identified that the problem is in the combo switch so I ordered a replacement.
Removal was easy but required removal of the steering wheel. Once removed, I also found that the contacts that are used to work the horn were damaged. Replacement was available at the dealership so I ordered a replacement set of contacts and replaced both the contacts and the combo switch at the same time.
I also replaced all of the brake hoses and re-bled the system. The pedal feel was very spongy so I suspected that I had air in the system.
There was a miss at idle that i eventually figured out when I was topping up fluids on one dark night and noticed a spark from cylinder number four.
The following week was spent flushing the torque converter and the transmission fluid and filter and also changed the diff oil on both this car and the gold 450SLC 5.0.